
The monitor is one of the important thing on PC and Laptop. Because you can’t see your system functions without a monitor. There are different types of monitors available on the internet. People like to upgrade the new features of monitors every time. The best monitors are the most important one for gaming and editor users. Because they use more effectively with the monitors. The refresh rate is the best feature for gaming people.
If you are a gamer, you need to try your games on high refresh rate monitors. You feel that the gaming experience on those monitors. But recently, most of the Windows 11 operating systems 144hz not working on their laptop or PC. You can easily fix that problem by applying some of the methods. The following methods will be more helpful to fix this problem on your Windows 11 system. I will show you how to fix 144 Hz not working on a Windows 11 monitor.
Also Read Spotify++ iOS is the most popular free premium application for iOS users. Using this application, you can unlock more spotify premium features for free of cost.
Enable 144Hz through Settings
You need to check the refresh rate on your Windows system. Because if you not enabled this option on your Windows, that will not work on your Windows system. So you need to enable that option first on your Windows operating system. Just apply the following steps on your Windows system.
- First, open the Start Menu and select the Settings application in the list.

- Then find the Display option in the list and select that option.

- Now scroll down and find the Advanced Display option in the list and open that option.

- Next, click on the Display Adapter properties option in that section.

- Now you will see the dialogue box on your screen. Then choose the Monitor tab on that box.

- Then choose the Refresh Rate to 144Hz. And click the OK option.

- After that, check your screen. It will work.
Update Graphics Driver
If you face display related problems, you must need to check with your graphics card version. This method will fixes this problem on your Windows 11 operating system. Just apply the following steps on your Windows system.
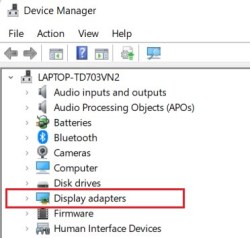
- Open the Run application by pressing the Windows Key + R buttons on your keyboard. Then type devmgmt.msc on the search box and hit the OK option.

- Now you will see the Device Manager on your screen. Now find the Display Adapters in the list and Expand that option.
- Then right click on your graphics driver and select the Update Driver option in the list.
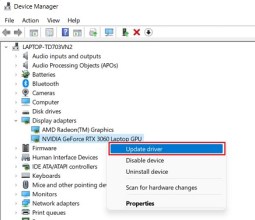
- Next choose the Search Automatically for Drivers option on that dialogue box.

- Now it will automatically search and install the latest version of graphics driver on your windows 11 operating system.
Restart your PC
If the above methods didn’t work, this method will work. Just restart your Windows 11 operating system. Most of the problems will fix by applying this method on their system. So just apply the following steps on your Windows system.
- Open the Start Menu and select the Power symbol on that section.

- Now select the Restart option in the list.

- After that, you windows will automatically set to restart.
- Then check your windows. It will work.


 | July 2025")


 | July 2025")

