Audio is the most important thing on smart devices. Most of the smart devices have audio output. That is used to listen songs and audio on devices. All the laptops have an audio output. Some of the PC systems also have audio output. But recently most of the windows 11 users faces Audio output errors while playing songs on their systems. So users can’t able to listen audio on windows 11 operating systems. This is the main problem on this error code problem.
Windows 11 users face audio error code 0xc00d4e86 on their windows systems. You can easily fix this problem by applying the following methods. Those methods didn’t affect your system personal files and documents. So you can do that without being afraid. Just apply the following methods on your windows 11 operating system. After that, you will get the fixed windows 11 audio error code 0xc00d4e86 on the system. I will show you how to fix windows 11 audio error code 0xc00d4e86 problem.
Check the Volume
You need to first check your audio volume on your windows 11 operating system. Just apply the following steps on your system. This method will work perfectly. Most of the people didn’t know if the volumes are correctly set on their system or not. So if you face this problem, you must try this method on your system.
- First open the Start Menu and select the Settings application in that menu.

- Now find the Sound option in the list and select that option.

- Then select the Speakers option below the Output section.

- Next on that page, check if everything is turned ON and most of the volume is Increased. If any volumes are down and tuned OFF, make them correct.

- After that, go back to your home screen and check whether your speaker is working or not.
Audio Troubleshooter
Most of the people worry about how to fix the audio not working problem. But Windows has own troubleshooting method to fix any type of audio error. Most of the windows users didn’t know about this method. Just apply the following steps on your windows 11 operating system. This method will work perfectly.
- Open the Start Menu and select the Settings application on that menu.

- Now scroll down and find the Troubleshoot option in the list. Then open that option.

- Next click the Other Troubleshooters option in the list.

- After that, scroll down and find the Playing Audio in the list. Then click the Run option in that option.

- Now the popup window shows on your screen. Now it will be detecting the problem with the speaker and select the Speaker type in that popup window.

- After that, it will automatically detect and fix that problem. Then check back your audio device.
Update Audio Driver
If you use an older version of the audio driver, you will face this kind of problem on your windows system. So you need to update your audio driver on your windows 11 operating system. This is also the cause for that problem. So just apply the following steps on your system.
- First open the Run application by pressing Windows Key + R buttons on your keyboard. Then type devmgmt.msc on the search bar and click the OK option.

- Now the Device Manager will be open on your windows. Then find the Audio, Video and Game Controllers option in the list and Expand that option.

- Then right-click on your Audio Driver and select the Update Driver option in the list.

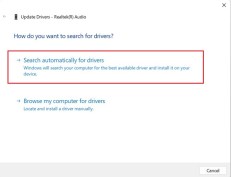
- Next you will see the popup window. Then select the Search Automatically for Drivers option.

- Now it will automatically download and install the latest version of the audio driver on your windows 11 operating system.


